Little Lottie: DIY

Friday, 1 May 2015

April Favourites


In true blogger style I've decided to do a favoruites post. I can't believe how quickly May has rolled round and that means summer is coming! My bank account isn't looking too healthy after watching many favourite videos on YouTube and giving in to temptation so my April favourites are budget friendly, enjoy!
Beauty.


This has been a must for me this month and I've been sporting it almost everyday. It's close to a Kylie Jenner colour and leaves a gorgeous stain on the lips. It also smells gorgeous and has a lovely formula with a matte finish. It can be quite drying after a few hours so be sure to carry it with you for re-application.  


This has been a total game changer for me. After hearing the gorgeous Freddy My Love rave about it I couldn't not try it, if it's good enough for a model it's good enough for me! The product is totally rave worthy, it smells of calming lavender and is made with amazing ingredients like crushed almonds. It's a manual exfoliator which I usually hate but it's super gentle and deeply cleanses my skin after a morning workout. 


I've had a very on and off relationship with the oil cleansing method but using a 50/50 mix of olive oil and castor oil is my new obsession. I've been using this in the evenings to take off my makeup and removing it with a hot flannel. Bliss. 


The Naked hair care range is super natural, made with 97% natural ingredients and it really works. I don't need to wash my hair as much and I'm not half as frizzy! The scents are also incredible and the product range is great to mix and match with like I have with the rescue/care collection. 


Book.


My latest venture is clean eating and I've got to say I will never turn back. Deliciously Ella's book has really helped with dinner and lunch ideas which are all really easy to make! Believe me I'm no chef and really don't enjoy cooking - just the eating part. Ella teaches to count nutrients not calories with plant based ingredients but you can switch things and add things if you want. 

I recently tried out one recipe but used wholemeal pasta and added salmon. It was a hit with the family and was super delicious!  


YouTuber.

Louisa Wendorff is an incredibly talented and beautiful singer who deserves a lot more subscribers. She has incredible tracks of her own and mashes up well known songs, my favourite being the Taylor Swift tracks. Go and check her out, guaranteed you will be as hooked as I am.  

Blogger.

Madeline Shaw is fairly new to the world of YouTube but is a well known yoga instructor to beauties like Millie Makintosh and Tanya Burr. Her book Get the Glow has just hit the shelves and I can't wait to get my hands on a copy. I have been scouring her blog for clean eating recipes and inspiration all month, they all contain ingredients your body will love! 

I hope you had a wonderful April, bring on May!

What's your April favourite?

Little Lottie
XO
Thursday, 27 November 2014

Lottie tries: Bblonde Ombre

Lately I have had to urge to change my hair, except when that happens my mind resorts to the most extreme change out of curiosity. For what feels like forever I have been growing my hair after one of my 'urges' turned into a disaster, I went shoulder length and had blonde highlights. Gradually as my hair grew the blonde grew with it and when the Ombre craze hit I had convenient roots. About a month ago my hairdresser said the blonde had to go, the bleach in my hair was years old and doing alot of damage. 2 inches came off and ever since the condition of my hair has been the priority but the boring single tone of my hair made me miss the old look so I was thrilled when Jerome Russell got in contact.

Jerome Russell are a salon quality brand that have created a range targeted at lightning the hair drastically at home! The range called Bblonde was interesting to me because it came with powder bleach and cream peroxide which are mixed together to lighten the hair, I personally hadn't come across this in a home dye kit in the drugstore before and went straight for the Maximum Ombre Kit No1 to finally try out the look properly. 


After reading tons of great reviews about the golden tone the kit gave I couldn't wait to see the results. I will always be brunette at heart and didn't want to go too light which is why this kit is great because you can experiment and leave the dye in until you are happy with the colour.  

It is important to do the strand and skin test to know how long to leave the mix in before you have your desired colour and to ensure you aren't allergic.

On go the old clothes, I'm sporting my fabulous 'Barbie' t shirt throughout so please enjoy the romantic shots of Barbie and Ken.

To prepare for the strand test you don't need much of the mixture just a couple of teaspoons.

Mixing the powder and cream makes this familiar blue colour, don't be alarmed!

The brush provided is so useful and makes even coverage really easy, so no need to be concerned about patches! 

I coated a strand from the back of my hair, concentrating particularly on the ends although the blending lotion does a great job with the gradient look.
For the skin test a cotton bud is the tidiest way to apply the mixture. I ended up leaving the mixture on for an hour, checking the colour every 10 minutes then reapplying until I achieved the colour I wanted. The maximum time is 90 minutes.

I was so impressed by the results and could see a big difference from my natural colour. Time to do it all over!

Firstly applying the blending lotion to achieve the gradient, ombre look. This made application really smooth.


Mixing all the remaining powder and cream gave me a really generous amount and considering the length of my hair I didn't need to buy a second box. If after using the kit you wanted to go even lighter Jerome Russell sell the Powder Bleach and cream Peroxide on their own so you can literally go as light as you want! The price is super reasonable and available at Superdrug.

Using the brush to apply to my mid lengths was so simple, the most difficult thing I found was making sure I started from the same place all the way around my head. Most people use their jaw as a starting point for the Ombre affect but I started at the middle of my neck to make the ombre very gradual, applying from the bottom upwards also helps with the gradient look. Make sure to cover your glamorous old clothes with an old towel! Who said the actual process was pretty...
Once fully coated the dye starts to dry, I left the mixture on for around 50 minutes and chilled out with Netflix.

So here are the results! I'm so happy with the look and have no idea why I didn't do it sooner. After reading so many positive reviews about Jerome Russell I didn't worry about the Ombre looking orange or coming out in a block of blonde it is truly gradual and subtle.

The box was stocked with everything I could possibly need and was simple to follow. 


The kit promises to lighten hair by 8-9 shades and it certainly did!


Thank you to Jerome Russell for letting me review the gorgeous kit!
Browse the range here!

Little Lottie xo

Sunday, 28 September 2014

DIY: Holiday Outfit


Hello you! Something a bit different today, a DIY post! I know it's a bit late in the year to be doing a 'holiday outfit' however I'm off to Makadi Bay in November and am in need of something summery as obviously the shops aren't equipped for that in Autumn. 

The lovely people at endlessleather offered some inspiration and here are the creations my mind concocted. 

I obviously chose a piece in my favourite colour and this leather cuff bracelet was super easy to make and bang on trend. 

You will need;
A leather cord of your choice
Super glue
A fastening 


I chose this toggle clasp from endlessleather's selection. 

The first step is to cut a piece of leather to your wrist size, remember to leave a space for your fastening and decide how tight or loose you want it. I slotted the leather into the fastening to ensure the bracelet wouldn't fall off once secured as my chosen clasp was quite long I didn't need much leather. 


Once you've decided the length cut the leather using sharp scissors. (preferably fabric scissors) Be careful as they are super sharp! 


Double check your length again then secure by popping a drop or two of super glue into your clasp.

Next push your leather or cord into the clasp and hold for a few seconds to set, repeat on the other side. I glued my cord at opposite ends of the clasp (one to the left and one to the right) to create the crossover you will see at the end. 

Notice that I glued the cord to opposite ends of the clasp

You should result with something like this, as you can see the pink cord is set in the clasp nicely. The bracelet does look lovely already and you can stop here if you wish.

Next I repeated this by cutting another piece of leather the same length and securing with glue but this time crossing over the first piece and gluing in the gaps of the clasp. 
Perfect fit!


You should result with something like this, if you wanted two straight bands that also looks lovely but I crossed mine over for something different. There is something very ballerina like about this lovely bracelet.


Display as you wish when you aren't showing off your DIY bracelet. Mine takes pride of place on this jewellery dish from Urban Outfitters. 


For my next creation I made a toga dress, they always look very Grecian and elegant which is a look I want whilst abroad. I was shocked at how easy this was to make, so if you've got some old clothes lying around think twice before you write them off completely!

To make the toga I used a pair of old leggings and a skirt. Alternatively you can start from scratch with material. 

Begin by creating the bottom of your toga, I simply tried on the old skirt and cut to a length that I wanted. Use some sharp fabric scissors and leave a few centimetres extra to hem after cutting so the fabric doesn't fray.


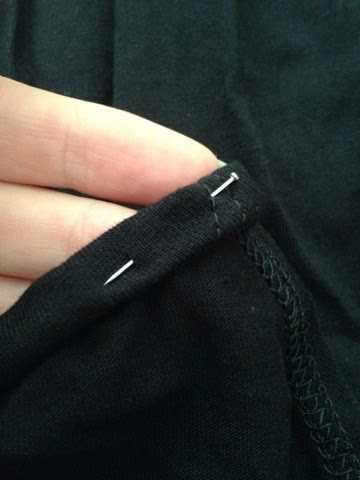
After choosing the length take some pins and fold around 2cm of the bottom of the skirt into the inside to create the hem. (refer to pictures, this was difficult to explain) 

Repeat this all the way around the skirt in a straight line like below. 
Once pinned get ready to sew, I used a zig zag stitch to ensure the material didn't fray in the future.

I'm pretty sure I have the cutest sewing machine 

Remember to take the pins out as you go so you don't damage your machine! 

Once the skirt is completely hemmed try on again to check the length and size. 

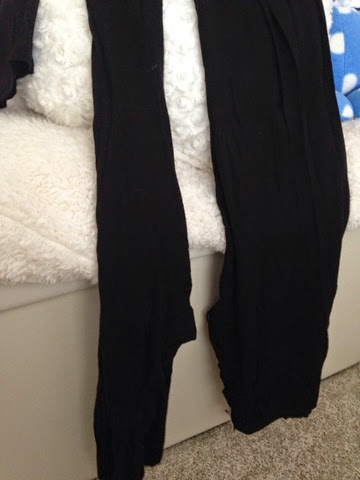
Next use two pieces of long material or the legs from the leggings if you are like me! 


These will be the cross over top of the toga dress, sort of like dungaree straps holding up the bottom (who knew leggings could become a dress so easily!) 

Pin the bottom of the material to the inside of the skirt elastic and fold over your shoulder to ensure there is enough fabric to reach the back part of the skirt. 
Like so...


Then sew in place!

You should now have something that looks like this. (secured on the front but not the back yet)
Now fold the excess material over your shoulder and tuck into the back of the skirt to make the strap! Pin into place making sure the size is right for you so that the strap doesn't keep falling off your shoulder. 

Excuse the washed out photos, the black material didn't get along with my camera 
Sew into place and voila! One side is finished.

Repeat this on the other side with your second piece of material, or legging leg.

You should now have a gorgeous toga dress! I'm really pleased with mine but we aren't done yet! 


For some finishing touches I added some leather cords from endlessleather.

First of all using this beautiful plaited flat leather as a belt, I twisted it to carry through the toga theme.


Next I ruched the shoulders by scrunching and stitching in place.

To finish off I added some lovely round turquoise suede from endlessleather for a pop of colour and a Grecian feel, it also covers the stitches nicely. 


I hope you liked this post and are happy with your results if you gave it a go yourself. Thank you to endlessleather for their generosity and inspiration.

Be inspired at www.endlessleather.com!

Done forget to comment and subscribe for more Little Lottie! xo